Category: Life

  • How I Compressed a PDF on My Mac Without Installing Anything

    How I Compressed a PDF on My Mac Without Installing Anything

    I recently needed to email a batch of PDF files. One of them was 151.5 MB. I wanted it below 25 MB, and I wanted to keep it as one PDF rather than split it into separate pages.

    My first attempt was the obvious one: open it in Preview and use Reduce File Size. That got it down to somewhere in the 40 MB range. Better, but still too large. I tried the same thing again, and the file actually got bigger.

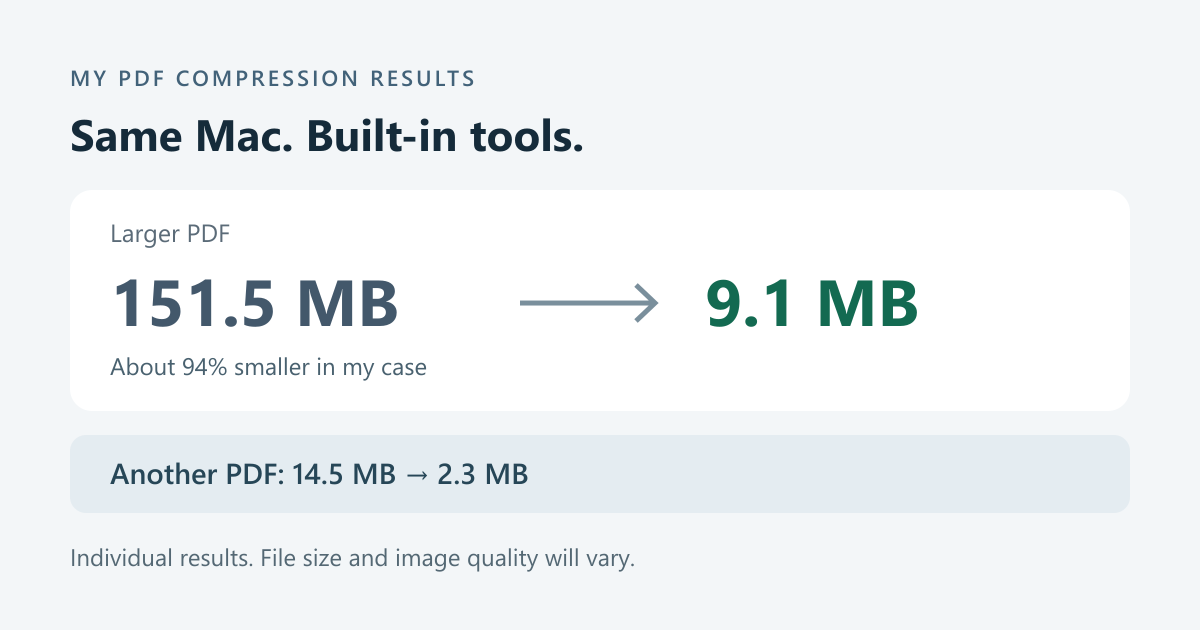
    The tool that helped was already on my Mac: ColorSync Utility. It lets you make a custom version of the PDF compression filter. After working through that, the final file I saw was 9.1 MB, about 94% smaller than the original. Another PDF went from 14.5 MB to 2.3 MB.

    Two personal PDF compression results: 151.5 MB to 9.1 MB, about 94 percent smaller; and 14.5 MB to 2.3 MB. Results vary by document.
    My actual file sizes. These are individual results, not a promised compression ratio.

    Those are the sizes of my files, not a result I can promise for every PDF. I also do not have a verified record of every setting used for the final 9.1 MB version. The settings below are a starting point to try, not a recipe that guarantees the same result.

    The two built-in tools you need

    Both Preview and ColorSync Utility come with macOS. There is nothing to install or pay for, and this workflow does not require uploading the PDF to an online compression service.

    Preview handles the export. ColorSync Utility lets you adjust the filter used for that export. The detail I initially missed was that the built-in filter is locked: you need to copy it before you can change it.

    Six steps: open ColorSync Utility, find Reduce File Size in Filters, duplicate the locked filter, adjust sampling and JPEG compression, export the original in Preview, and inspect every page.
    The workflow at a glance. This is a guide diagram, not a macOS screenshot.

    1. Open ColorSync Utility

    Press Command + Space, type ColorSync Utility, and open the app. You can also find it in Applications → Utilities.

    2. Find the Reduce File Size filter

    Click Filters in the toolbar, then find Reduce File Size. Expand the filter using the arrow beside its name. Inside it, look for Image Sampling and Image Compression.

    The labels and controls can look a little different depending on your macOS version and language. The important thing is to find the filter and its two image settings.

    3. If everything is greyed out, duplicate the filter

    This was the part that stopped me. I expanded Image Sampling, but all the settings were grey and I could not edit them.

    The original system filter is locked. Look on the right side of the filter row for the Duplicate button: two overlapping document outlines, just to the left of the padlock. Apple confirms this in its ColorSync Utility guide.

    Apple ColorSync Duplicate button, shown as two overlapping document outlines.Duplicate
    Click this first
    Apple ColorSync closed padlock icon indicating a locked filter.Locked
    Original cannot be edited
    Button images: Apple ColorSync Utility User Guide. This is an icon guide, not a full app screenshot.
    1. Click the Duplicate button beside Reduce File Size.
    2. Select the new copy. Depending on the version, its name may start as Reduce File Size Copy.
    3. Rename it to something recognizable, such as My PDF Compression.
    4. Expand the copy and edit its settings. Leave the original system filter alone.

    Some older versions put Duplicate Filter inside the menu on the right of the filter name. The idea is the same: edit a copy, not the locked original.

    4. Adjust image sampling and compression

    For a first attempt, these are reasonable settings to experiment with:

    SettingStarting point to try
    Image Sampling → QualityHigh
    Image Sampling → Set Resolution144 Pixels/Inch
    Image Compression → Mode / CompressionJPEG
    Image Compression → QualityStart toward High; try Medium if needed
    Trial settings only. These are not the verified complete settings for my 9.1 MB file.

    If there are checkboxes beside the settings, enable the resolution setting you intend to use. Also check any inherited scale or pixel-size limits: those can affect the result too. Adjust them for your document rather than assuming the resolution field is the only control that matters.

    Older ColorSync Utility interface showing a custom filter with Image Sampling and Image Compression sections. The screenshot uses 150 dpi and Medium sampling quality, not the suggested starting settings in this article.
    An older ColorSync interface, shown only to help identify the two settings sections. The screenshot uses 150 dpi and Medium sampling quality; it is not my final configuration. Image: Daniel Beck, Super User, June 7, 2011, CC BY-SA 3.0, unmodified.

    144 dpi will not suit every PDF. If the file has small text, fine lines, stamps, or QR codes, try a higher resolution if needed. JPEG compression can also introduce visible artifacts. The goal is a smaller file that is still readable, not the smallest possible number.

    5. Export from Preview using your new filter

    1. Open the original PDF in Preview.
    2. Choose File → Export. Use Export, rather than a different PDF-saving command.
    3. Make sure the format is PDF.
    4. Open the Quartz Filter menu and choose My PDF Compression, or whatever you named the filter.
    5. Save under a new filename, such as document-compressed.pdf. Keep the original.
    6. Check the new file size in Finder.

    Apple documents the File → Export → Quartz Filter route in Preview. Your custom filter gives you a way to adjust the image settings instead of repeatedly using the default preset.

    If it is still too large, adjust the JPEG quality or sampling resolution and export again from the original. Repeatedly compressing an already compressed copy can make image quality worse without reliably making the file smaller.

    What if the new filter does not appear in Preview?

    Try closing and reopening Preview after creating the filter. If it still does not appear, you can apply the filter in ColorSync Utility itself: make a separate copy of the PDF first, open that copy with File → Open, select your filter in the menu at the bottom of the document window, inspect the preview, then click Apply. Apple describes this alternative workflow here.

    6. Open the result and check every page

    Before sending the file, open the compressed version and go through it page by page. Check that:

    • Text and small numbers are still readable when you zoom in.
    • Images, fine details, and any QR codes remain clear enough for their intended use.
    • All pages are present and in the right order.
    • The file opens normally and still contains everything you need.

    A smaller file is not useful if the person receiving it cannot read it. There can be a trade-off between file size and image quality, and there is no fixed setting that avoids that trade-off for every document.

    Why did Preview make my PDF bigger?

    I cannot identify the exact cause for my file. Rewriting a PDF can change image encoding and other internal data, and a file may already contain compressed images. A command called Reduce File Size is not a promise that each new export will be smaller.

    My practical takeaway is to compare the output with the original, keep whichever version works better, and try a custom filter if the default one is not helping. Repeating the same export over and over did not solve it for me.

    Why I kept the compression local

    I did not need an online PDF compressor for this. Preview and ColorSync Utility process the document on the Mac, so the compression step does not require sending it to a third-party website. For my own files, that is a useful reason to try the built-in tools first.

    Under 25 MB, but the email still says it is too large?

    There was one more surprise. Five PDFs showed a combined size of about 23 MB in Finder, but the mail client reported attachments of more than 31 MB.

    One important explanation is email encoding. Binary attachments are commonly Base64-encoded for transport, which adds roughly one third to their size. Microsoft explains the approximately 33% increase and its effect on email size limits.

    For a rough calculation, 23 MB × 4 ÷ 3 ≈ 30.7 MB, before line wrapping, the message body, and other email overhead. That is consistent with the larger figure I saw, although I did not inspect the raw message to measure each part.

    So a PDF below 25 MB does not necessarily make the whole email smaller than 25 MB. Providers can also define and enforce their limits differently. Go by the actual sending and receiving limits; if a batch is too large, sending the PDFs across multiple emails may be better than sacrificing more clarity. Each PDF can still stay in one piece.

    What worked for me

    The useful discovery was not a magic compression number. It was that macOS already had a tool for editing the filter, and that the greyed-out settings became editable once I made a copy.

    For my large PDF, the final result was 9.1 MB instead of 151.5 MB. I got to keep it as a single file, did not install anything, and did not need an online compression site. If Preview is making your PDF bigger, ColorSync Utility is worth trying.

    References and image credits

  • Shopping Through the Wealthsimple Rewards Store: My Experience

    Update (October 15, 2026): The Wealthsimple Rewards Store now charges sales tax, at least here in Ontario. My earlier experience of having no extra tax added no longer applies. I no longer consider it a tax-free shopping perk, and I have updated the description below.

    If this is useful and you decide to try it, my referral link is https://www.wealthsimple.com/invite/QQSF5Q. You can also use the code QQSF5Q.

    I have been using the Wealthsimple credit card for almost half a year now. For a while, my setup was a Scotiabank black card plus the red Rogers Bank card, but recently most of my daily spending has moved to Wealthsimple.

    The cash back is not necessarily the absolute highest if you optimize every category one by one. But the part I like is that, on my card, eligible purchases earn a flat 2% back. No categories to remember, no mental spreadsheet at checkout, and fewer tiny decisions every time I pay for something.

    Wealthsimple rewards store showing Apple Watch, coffee maker, luggage, MacBook, and iPhone options
    The rewards storefront inside Wealthsimple.
    September 2026 Wealthsimple rewards checkout showing cash back applied to an AirTag purchase with zero balance due
    My AirTag checkout from September 2026. Sales tax is now charged in Ontario.

    Wealthsimple has a rewards storefront where you can redeem cash back toward actual products. I have seen things like iPhones, Apple Watches, AirTags, MacBooks, and other gadgets there. When I first wrote this post in September 2026, the checkout I used did not add a separate sales-tax line. That has since changed: I now see sales tax charged at checkout in Ontario, so the tax-free shopping perk I originally described no longer applies to my purchases here.

    Another nice detail is that you do not necessarily need enough cash back to cover the entire purchase. Wealthsimple lets you use cash back to cover at least 50% of the total, then pay the remaining balance. That makes the store feel a lot more practical than a typical points catalogue where you either have enough points or you do not.

    For me, the more practical benefit is actually the bookkeeping. Once spending, investing, and cash back all live in Wealthsimple, it becomes easier to look at my own cash flow, spending patterns, and investment behaviour without piecing things together across a bunch of apps.

    There is one important fee caveat. The card has a $20/month fee unless you qualify for a waiver. As of September 2026, Wealthsimple says the fee can be waived if you have at least $100,000 in individual assets/net deposits with them, or if you set up a qualifying direct deposit of at least $4,000/month into a Wealthsimple chequing account. Terms can change, so check the current details in the app or on Wealthsimple’s official credit card page before applying.


    Referral

    If this is useful and you decide to try it, my referral link is https://www.wealthsimple.com/invite/QQSF5Q. You can also use the code QQSF5Q.

    In my app, the referral offer says that if you use my referral and apply for the credit card, both of us may be eligible for 5% cash back for one month. Eligibility and promotional terms can change, so please double-check the offer before applying.

    Referral disclosure: I may receive a benefit if you use the code. This is just my personal setup and experience, not financial advice.

  • Self Ramen Bar in Toronto

    I have been suggested multiple times by YouTube about the Self Ramen Bar in Korea. I was impressed because that’s something I had never done before, until today.

    I was heading to my favourite rice noodle restaurant – Fudao Ricenoodle. But I felt a little cold because I didn’t wear my jacket. I saw “Self Ramen Bar” just right across the street. I knew there was a “Ramen Bar” but I had never noticed “Self”. At that moment I realized the bar was probably the “Self Ramen Bar” on YouTube.

    So, I went there. Ordered a Shin Ramyun. It was more delicious than when I cooked it at home – the added toppings of chicken breast were great too.

    The only difference from the Self Ramen Bar on Youtube was that there were two workers there, probably because it’s something new in Canada. They were quite friendly and helpful, improving the overall experience. I wish there was a way to give tips!

  • PC Build – Upgraded my desktop computer

    I did a PC build, which was an unexpected upgrade. I had dual monitors setting, one is 1440P (27″) while the other is 1080P(22.5″). I had some trouble because of the mouse offset moving across monitors. Last Friday (August 11, 2023), there was a sale on an Acer 27″ 1440P monitor. I bought it.

    However, my PRIME B550M-A WIFI II only had one HDMI cable. I didn’t have a GPU. I thought the DVI-D cable should do the job. But soon I learned that DVI-D to HDMI only supports up to 1080P.

    I was looking for solutions. Some people said an adapter might work, but I couldn’t find such an adapter. Then, I learned that USB to HDMI adapters might work too. So, I purchased such an adapter (It could output one 1080P and one up to 4K).

    But not sure if this was a placebo effect, I felt the display connected to the adapter wasn’t as smooth as the one connected directly to the motherboard’s HDMI port (I set the same refresh rate).

    At that point, I realized that the only feasible solution was probably installing a GPU, which I didn’t expect to do. I packed the newly-bought monitor and decided to return it. “Thanks” to the big data, the FB marketplace suggested a $25 GTX760. The seller claimed the item was “in new condition”. I was thinking: “Well, why not give it a shot? My FB marketplace experience has been great so far. This guy has a 4.5 rating”.

    So, I met the guy and got the GTX760. It was not in new condition because there was just too much dust and the plate was rusted. I told myself: “It’s probably why the seller only sold it for $25”. I installed the GPU. It only worked few minutes and my desktop couldn’t power on anymore, even without the GPU.

    Later on, after some testing, I confirmed that the motherboard was broken. Deciding between upgrading or repairing, I went with an upgrade. Even though the new motherboard has two HDMI ports, I still get a GPU.

    My current specs are as follows:

    1. CPU: AMD Ryzen 7900
    2. Motherboard: TUF Gaming A620M-PLUS WIFI
    3. Memory: CORSAIR VENGEANCE DDR5 RAM 64GB (2 * 32GB)
    4. GPU: Asus ASUS Dual GeForce RTX™ 4060 OC Edition 8GB GDDR6
    5. SSD:
      • Samsung 990 Pro with Heatsink 1TB (the same friend gave it to me as a birthday gift, I really appreciate!)
      • Samsung 970 EVO PLUS 1TB
      • SSSTC CA6-8D1024 1TB (my friend pulled it from his laptop and gave it to me)
    6. PSU: DeepCool DQ750-M-V2L 750W
    7. Case: DeepCool Matrix 55 V3

    Highlighted are unupgraded components.

  • Smart Lock – What I love most about my Samsung Devices

    Have been using a Samsung smartphone for nearly one year and a half, a feature I love most is not anything fancy but Smart Lock.

    This is not the Smart Lock that I installed at my front door – it’s for unlocking the smartphones.

    In short, it automatically keeps the devices unlocked in certain scenarios, for me, I set it up as follows:

    1. I am in my house (it’s not always accurate unfortunately), OR
    2. My device is connected to my Galaxy Buds Pro, OR
    3. My device is connected to my Galaxy Watch 4

    The last two are very accurate and reasonable. If I am wearing buds or a watch, I no longer need to unlock the screen manually.

    When I am going to buy a new phone this year or next year, I will do some research if the new smartphone has something similar. This is the feature I love most.

  • Samsung health doesn’t include the one extra hour today when the daylight saving time ended.

    Today is the time: the daylight saving time ended – the time was rolled back one hour at 2PM.

    I woke up checking my Samsung Health app. I am using a Galaxy Watch 4. I have made some complaints about the sleep tracker although the product overall is great. This morning I am disappointed again – it seems like the sleep tracker doesn’t include the extra one hour.

    As you can see, I slept from 1:26 AM to 9:25 AM, which’s ~ 8 hours. But if you include the one extra hour, I should have slept for ~ 9 hours.

    Anyway, I should watch to get to bed early and get up early😂. This screenshot discloses my bad habit.

  • No longer an Apple user – sold my iPad today

    I have never been an Apple fan, however, more than 2.5 years ago in 2019, I bought my first and only Apple product – iPad wifi 128GB (6th gen). I used it mainly for taking notes paperlessly. The experience was great.

    But today I sold my iPad together with Apple Pencil, which would be replaced by Samsung Tab S7 & S Pen. It is a result of my embracing into Samsung’s ecosystem, not Apple’s. I like the openness & customizability of Android, and iOS UI is just not my type. Additionally, S Pen works well so far, at least better than my sold 1st gen Apple Pencil.

    Yet, I acknowledge iPad as a good product. If you love Apple’s ecosystem, definitely use it. The ecosystem is very important as I realize now.

  • Leaving my first job today at Infrastructures For Information

    Today, I am leaving my position as Software Developer at Infrastructures For Information (i4i).

    I feel so down, and I even want to cry… I don’t know why, but I just feel that it is my first job, it is my regret that I can not work with them for a longer period. Also, my journey of the internship was destroyed by the pandemic. I had an offer at another company at the beginning, but suddenly my offer was revoked after the COVID-19 break, then, i4i gave me the chance to explore software development. I am very grateful for it.

  • Received my second Moderna dose today

    Today at 2:23 PM, I received my second Moderna dose.

    My second dose had been scheduled for August 29, but thanks to the vaccination acceleration, I managed to reschedule it early this week, and finally got it this afternoon.

    So far, I am feeling normal, which is similar to the first dose. But maybe in several hours, I will feel something uncomfortable, I am ready for it.

  • Back to UofT campus on May 23, first time in the past 14 months

涵琪bb我爱你😘